Thursday, 26 February 2015

Setup periodic journal


            Setup periodic journal


how to setup and use periodic journal in Dynamics AX 2012.  Periodic journals are sometimes called recurring journals because the amount, text, and other information are repeated each time that the journal is posted. When you create the journal, you can specify the period interval for the recurrence, such as days or months.
1/ Prerequisites

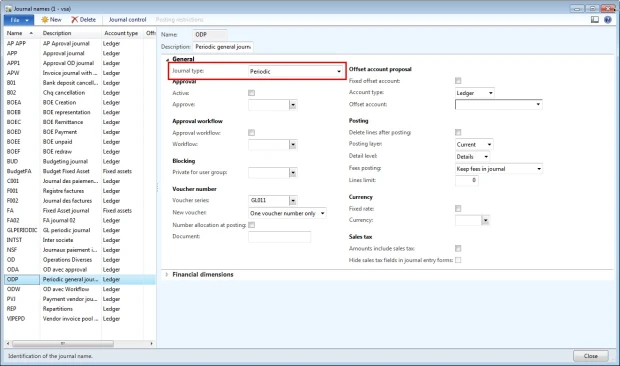
You need to create a new journal name to use the periodic journal functionality.
Access: GL > Setup > Journals > Journal name
PeriodicJournalGL005

2/ Setup periodic journal

To setup a periodic journal, there are several options : create periodic journal from the general journal form or from the periodic journal form.
Option A: General journal form
Access: GL > Journals > General journals
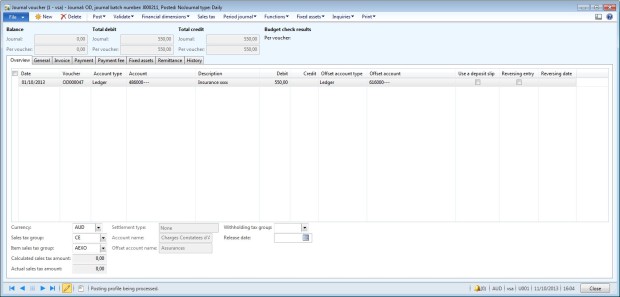
  • Create a new journal
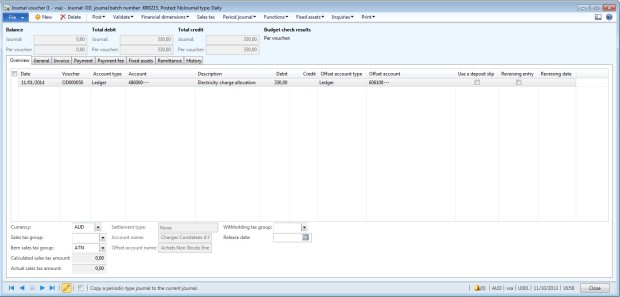
  • Go to the line form an enter all your data (date, accounts, amounts, description, …)
PeriodicJournalGL002
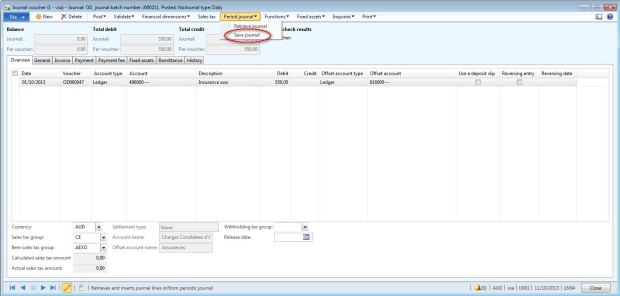
  • Click on Period journal > Save Journal
PeriodicJournalGL003
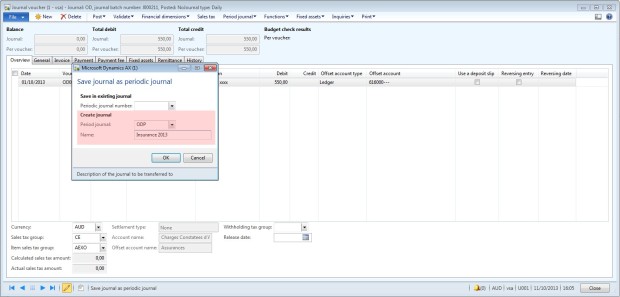
  • Select a periodic journal
  • Enter a name.
  • Click on “OK”
PeriodicJournalGL004
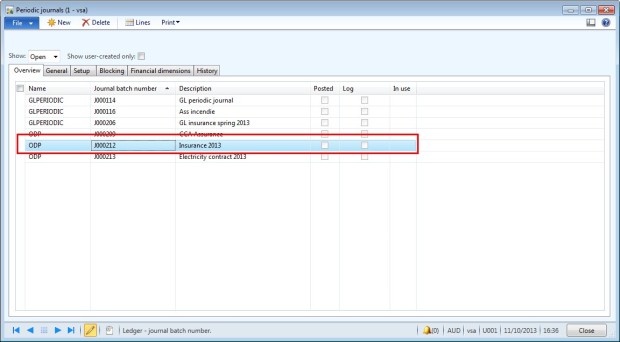
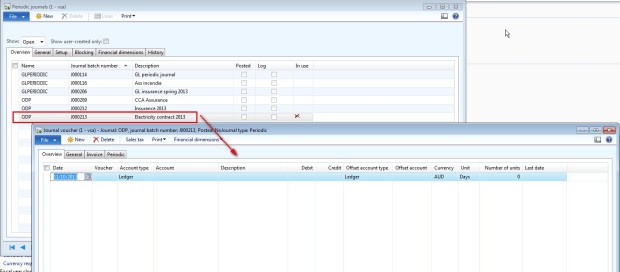
  • Go to Periodic > Journals > Periodic journals to update data
PeriodicJournalGL009
  • Click on Lines
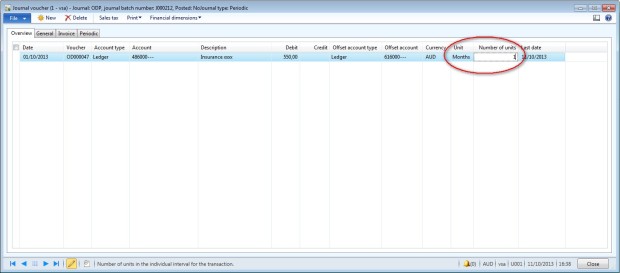
  • Enter (if needed) a unit and a number of unit : for example, if the journal must be posted every months, enter unit = month and number of unit = 1.
PeriodicJournalGL010
Option B: Periodic journal form
This option is better if you need to setup period interval recurrence.
Access: GL > Periodic > Journals > Periodic journals
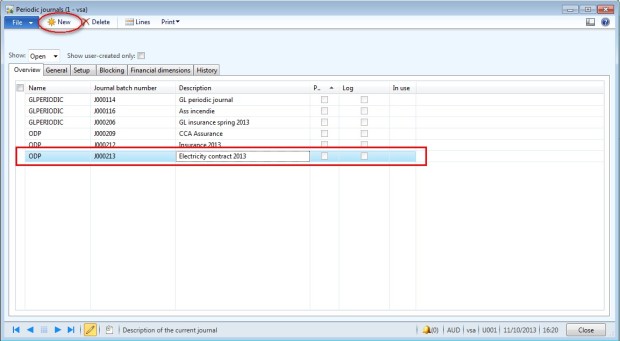
  • Click on New
  • Select a periodic journal name
  • Enter a description
PeriodicJournalGL006
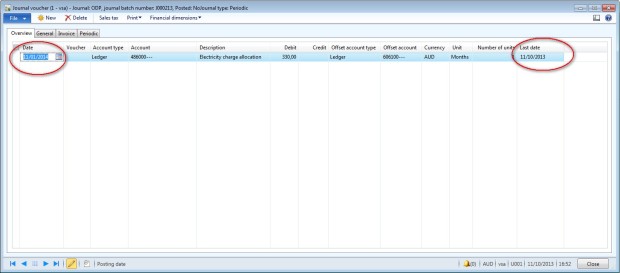
  • Go to the lines form
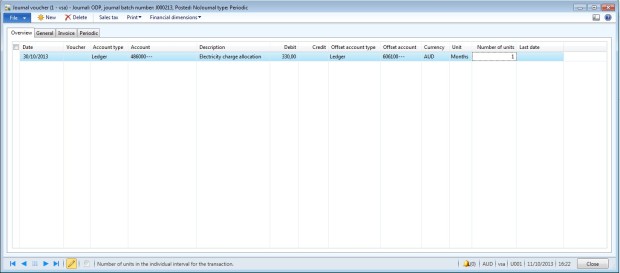
  • Enter a date (firs date)
  • Enter regular data : account, offset account, amount, description, …
  • Select a unit and a number of unit : for example, if the journal must be posted every months, enter unit = month and number of unit = 1.
  • The “Last date” field will be updated automatically by the system.
PeriodicJournalGL007

3/ Use a periodic journal

Access: GL > Journals > General journal
  • Create a general journal
  • Go to the Lines form
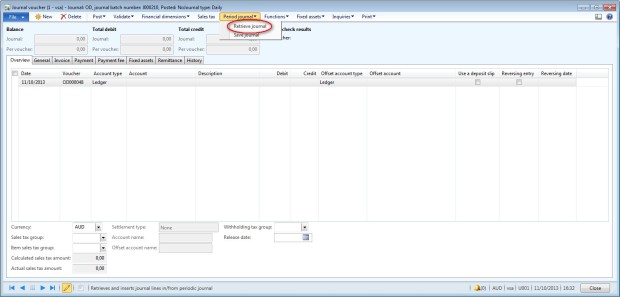
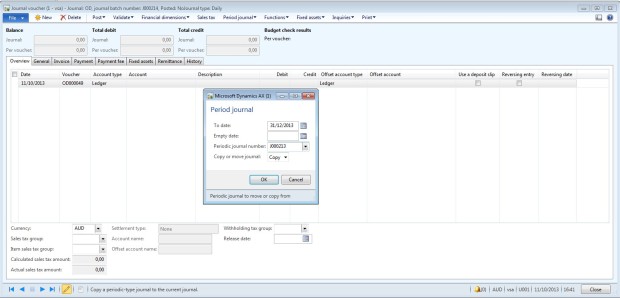
  • Click on Period journal > Retrieve journal
PeriodicJournalGL008
  • Enter a “To date”
  • If the line in the periodic journal does not have a transaction date, you can select one in the Empty date field. If you do not select a date in this field, the date in the To date field becomes the transaction date.
  • Select a periodic journal
  • Select an option: Copy or Move. (choose Move only if you do not need to use again the periodic journal)
PeriodicJournalGL011
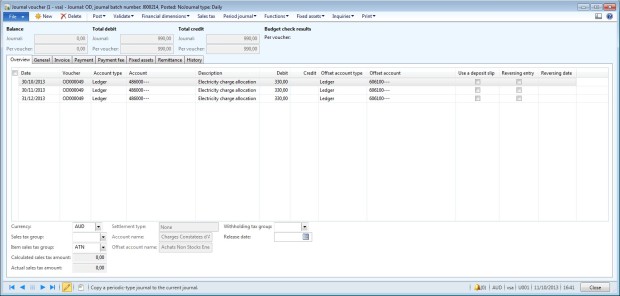
  • Journal lines are created. In this example, the to date is 3 months later than the today date, that why the system creates 3 lines, one per month.
  • Check the journal and post it.
PeriodicJournalGL012
Remark : When a journal is created, the periodic journal is automatically updated : the date become the next date and the Last date is updated with the journal date. 
PeriodicJournalGL013

4/ Use a periodic journal with option Move

Access: GL > Journals > General journal
  • Create a general journal
  • Go to the Lines form
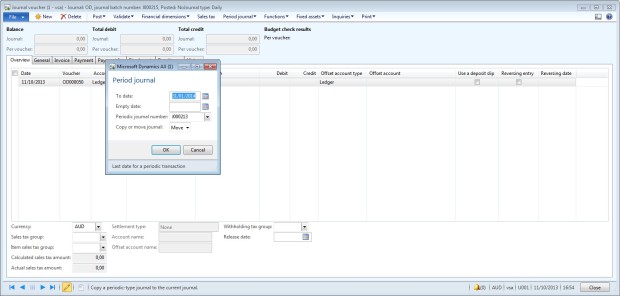
  • Click on Period journal > Retrieve journal
  • Enter a “To date”
  • Select a periodic journal
  • Select “Move”
PeriodicJournalGL014
  • Journal line is created.
PeriodicJournalGL016
  • Periodic journal line is deleted
PeriodicJournalGL015

Accrual schemes Setup


             Setup Accrual schemes


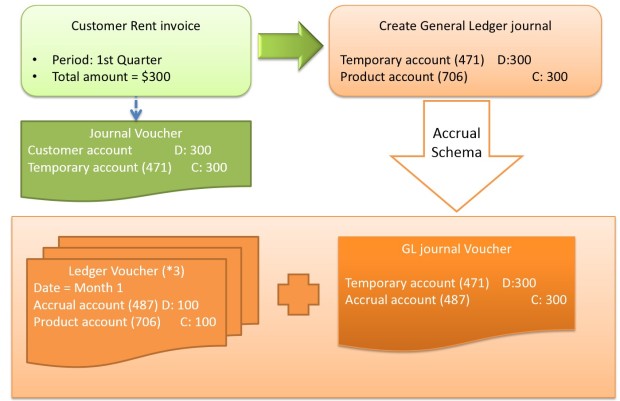
 how to setup and use accrual schemes in Dynamics AX 2012. Ledger accruals redistribute the costs or revenues of a journal line so that the costs and revenues are recognized in the appropriate periods. In the first step, you enter the invoice in a temporary account (or a prepaid account). And when you use the accrual scheme functionality, the temporary account is reversed to be allocated in the charge or product account in each appropriate periods. To illustrate this functionality, I will use two examples, one with a vendor invoice and one with a customer invoice:
  • Example 1: I receive a rent invoice from a vendor for the next quarter. Total amount of the invoice is $300. If I enter directly the amount, all the charge are going to be allocated for the same period. But I want to allocate each third in the good period.
  • Example 2: I send a rent invoice to a customer for the next quarter. Total amount of the invoice is $300. If I enter directly the amount, all the product is going to be allocated for the same period. But I want to allocate each third in the good period.

1/ Setup accrual schemes

Access: GL > Setup > Posting > Accrual schemes
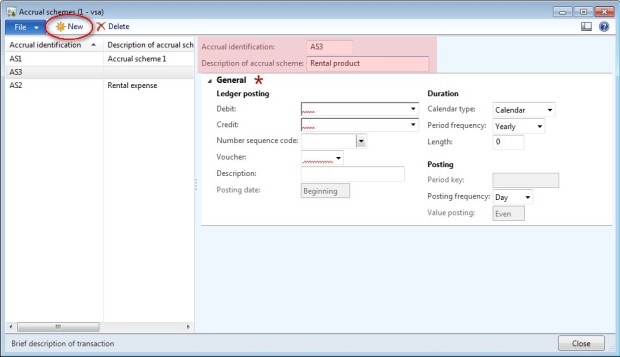
  • Click New to create an accrual scheme.
  • Enter an accrual identification and a description of the scheme
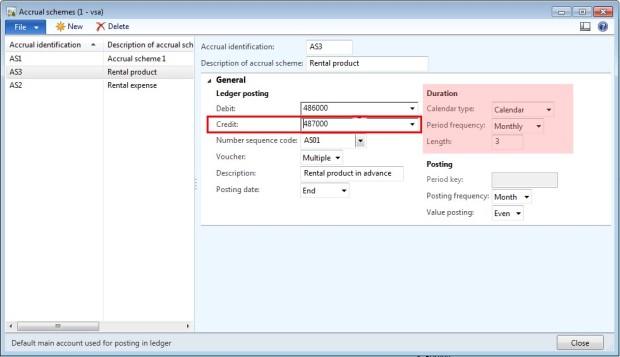
AccrualSchemesGL001
For a charge accrual scheme (example 1) :
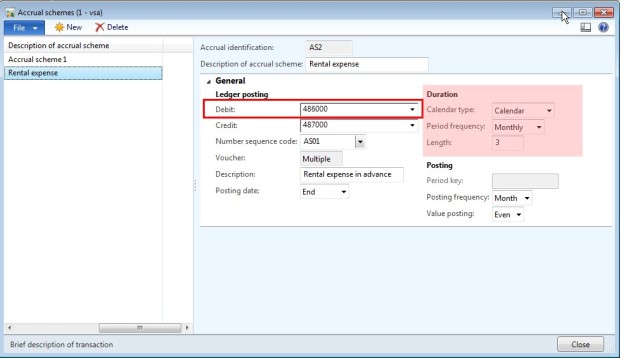
  • Enter the accrual account in the field “Debit” and an other account in the field “Credit”.
  • Select how to use voucher:
    • Base: the main voucher number is used for all generated transactions.
    • Single: a new voucher number is used for each transaction date.
    • Multiple:  a new voucher number is used for all accrued transactions.
  • If you have selected the single or multiple option, select a sequence code.
  • Enter a description.
  • Select the calendar type to use, the frequency and the length. In the case of the example 1, I want to follow the calendar type (not fiscal), for 3 months.
  • Select the posting frequency: in my example, I want to post the accrual scheme each month.
  • In the field “Value posting”, select the option of the calculation : Even = same amount for each period or scale = amount depend of the number of the days.
  • Select the posting date : beginning, middle or end.
AccrualSchemesGL003
For a product accrual scheme (example 2) :
  • Enter the accrual account in the field “Credit” and an other account in the field “Debit”.
  • Select how to use voucher: Base, Single or Multiple. If you have selected the single or multiple option, select a sequence code.
  • Enter a description.
  • Select the calendar type to use, the frequency and the length. In the case of the example 2, I want to follow the calendar type (not fiscal), for 3 months.
  • Select the posting frequency: in my example, I want to post the accrual scheme each month.
  • In the field “Value posting”, select the option of the calculation : Even = same amount for each period or scale = amount depend of the number of the days.
  • Select the posting date : beginning, middle or end.
AccrualSchemesGL002

2/ Accrual scheme : Charge

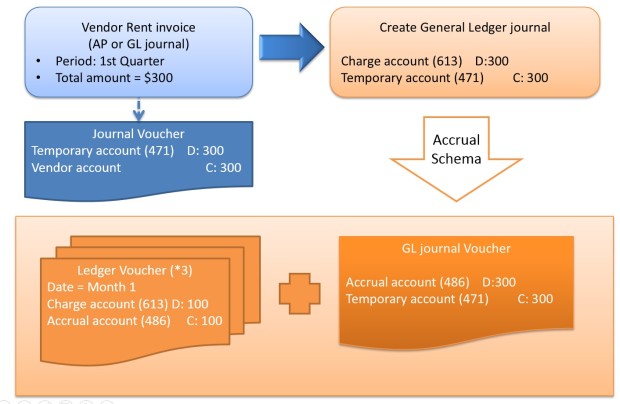
Example 1: I receive a rent invoice from a vendor for the next quarter. Total amount of the invoice is $300. If I enter directly the amount, all the charge are going to be allocated for the same period. But I want to allocate each third in the good period.
AccrualSchemesGL004
Step 1: Enter the invoice
Access: AP > Journals > Invoices journal (or use purchase order)
  • Create a new journal
  • Go to the line and create a new journal line.
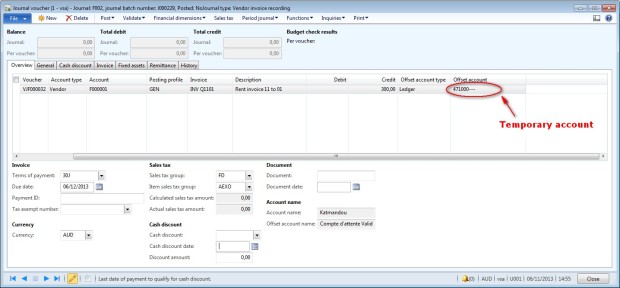
  • Select the vendor account, VAT account if necessary, and other information (invoice number, terms of payment, …)
  • Select a temporary account in the offset account field and not the charge account.
AccrualSchemesGL005
  • Post the journal
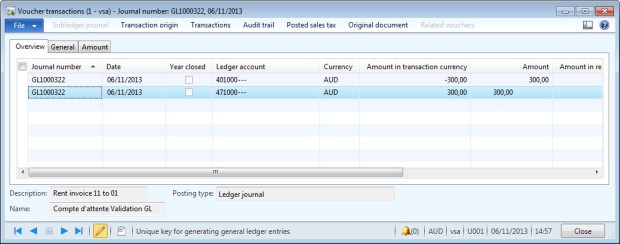
  • Go to Inquiries > Voucher to check the accounting: Debit = temporary account and Credit = Vendor account
AccrualSchemesGL006
Step 2: Accrual schemes
Access: GL > Journals > General journal
  • Create a new journal
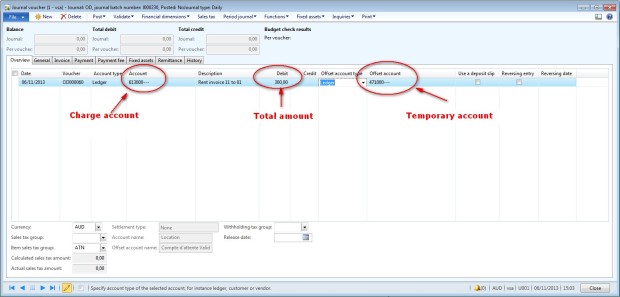
  • Go to the line and create a new journal line.
  • In the field account, select the charge account.
  • Enter the total amount of the invoice in the debit field ($300)
  • Select the temporary in the Offset account field.
AccrualSchemesGL007
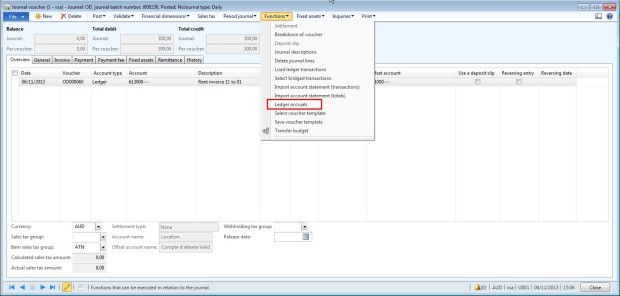
  • Go to Function > Ledger accrual
AccrualSchemesGL008
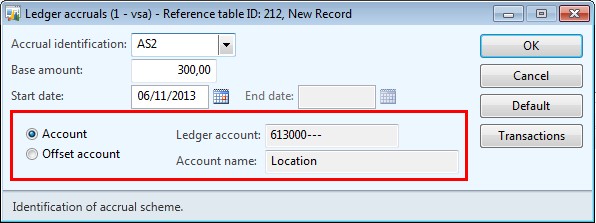
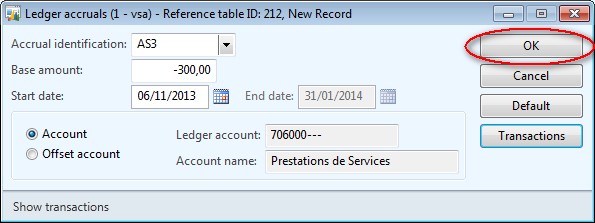
  • Select the accrual schema to use
  • Check that the charge account is selected in the field “Account/Ledger account”
AccrualSchemesGL009
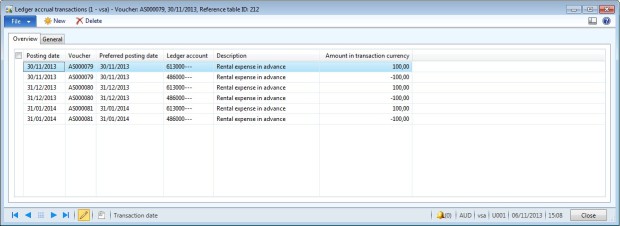
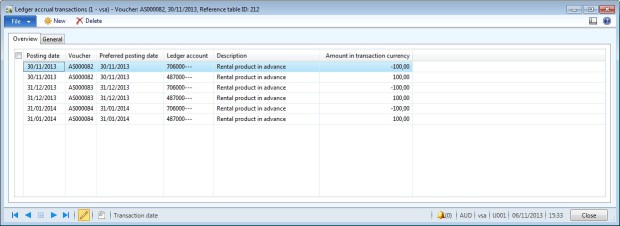
  • Click on “Transactions” to check if the accounting is correct.
AccrualSchemesGL010
  • In the example, we have 3 voucher with amount equal $100 (300/3) and each accounting date equal to the end of the three months.
  • Accounting for each voucher is: Debit = charge account and Credit = accrual account.
  • If the transactions are not correct, click on “Cancel”.
  • If it is correct, click on “OK”
AccrualSchemesGL011
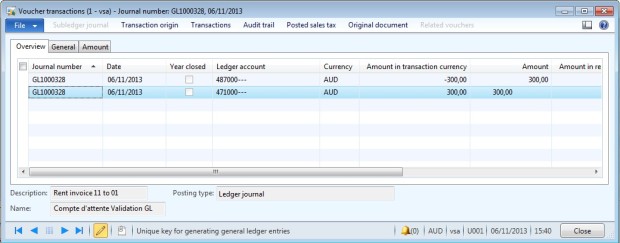
  • Post the journal.
  • Go to Inquiries > Voucher to check the accounting: Debit = Accrual account for the total amount and Credit = Temporary account.
AccrualSchemesGL012

3/ Accrual schemes : Product

Example 2: I send a rent invoice to a customer for the next quarter. Total amount of the invoice is $300. If I enter directly the amount, all the product is going to be allocated for the same period. But I want to allocate each third in the good period.
AccrualSchemesGL013
Step 1: Enter the invoice
Access: AR > Common > Free text invoice > All free text invoices (or use a GL journal)
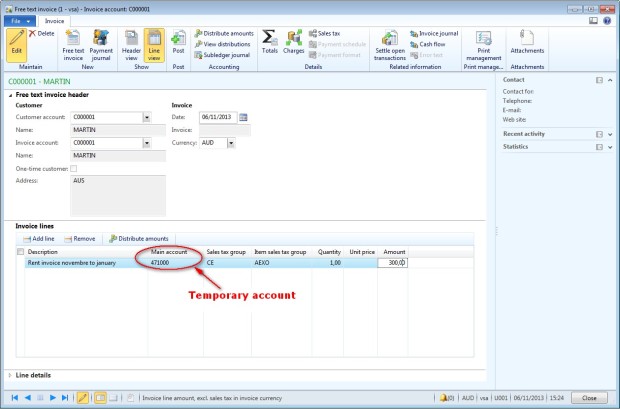
  • Create a new free text invoice
  • Select the customer account and other information you need.
  • Select a temporary account in the account field and not the product account.
AccrualSchemesGL014
  • Post the invoice
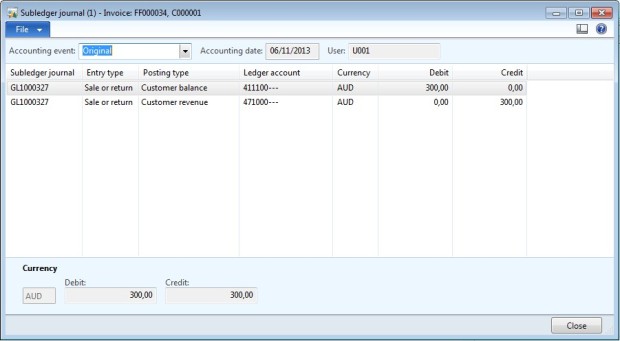
  • Check the accounting: Debit = Customer account and Credit = Temporary account.
AccrualSchemesGL015
Step 2: Accrual schemes
Access: GL > Journals > General journal
  • Create a new journal
  • Go to the line and create a new journal line.
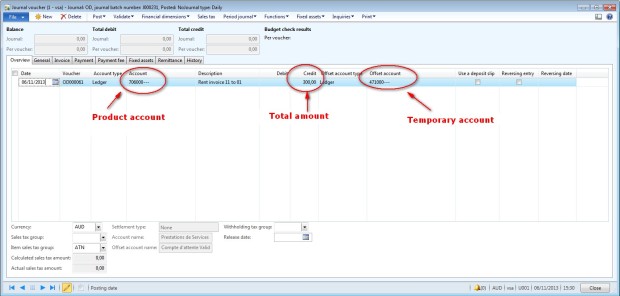
  • In the field account, select the product account.
  • Enter the total amount of the invoice in the credit field ($300)
  • Select the temporary in the Offset account field.
AccrualSchemesGL016
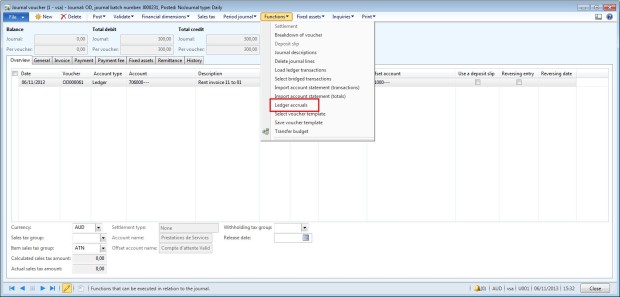
  • Go to Function > Ledger accrual
AccrualSchemesGL017
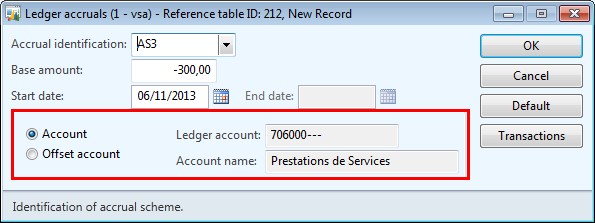
  • Select the accrual schema to use
  • Check that the product account is selected in the field “Account/Ledger account”
AccrualSchemesGL018
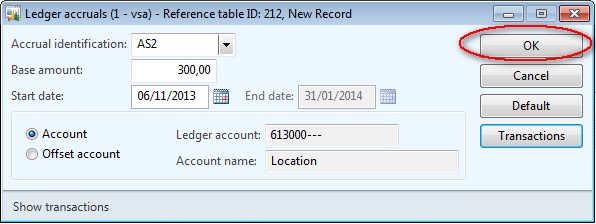
  • Click on “Transactions” to check if the accounting is correct.
AccrualSchemesGL019
  • In the example, we have 3 voucher with amount equal $100 (300/3) and each accounting date equal to the end of the three months.
  • Accounting for each voucher is Debit = accrual account and Credit = Product account.
  • If the transactions are not correct, click on “Cancel”.
  • If it is correct, click on “OK”.
AccrualSchemesGL020
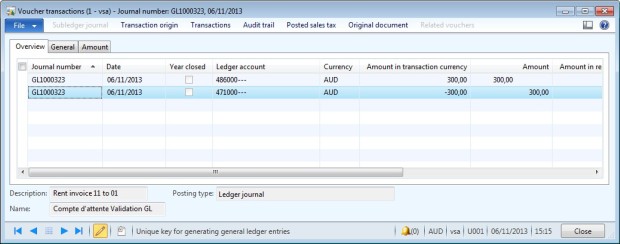
  • Post the journal.
  • Go to Inquiries > Voucher to check the accounting: Debit = Temporary account for the total amount and Credit = Accrual account.
AccrualSchemesGL021

4/ Ledger settlements

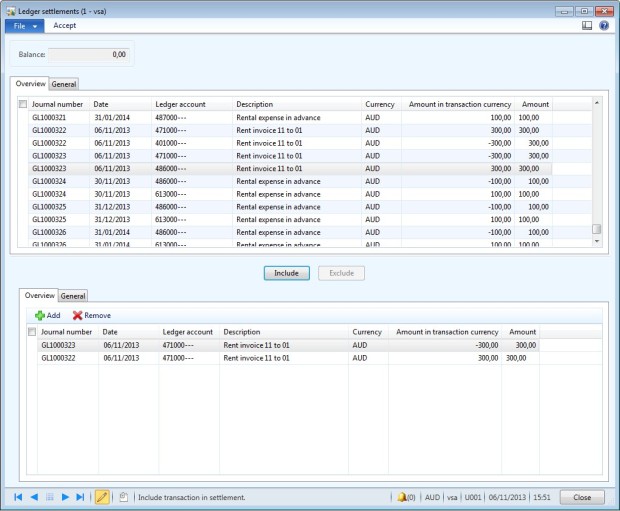
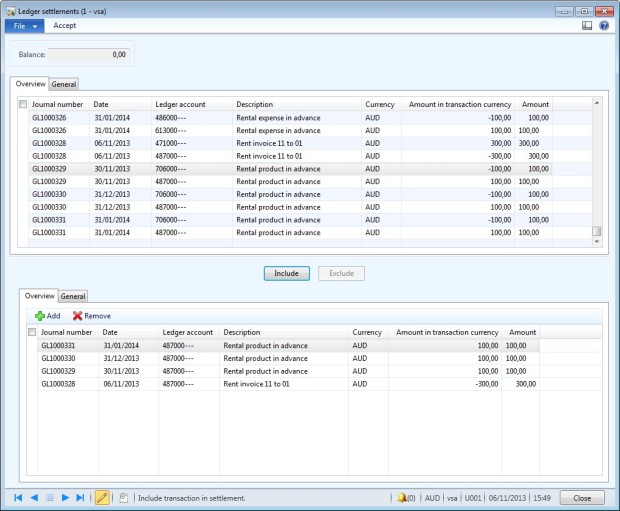
To close this process, you need to pay the invoice and it is better to settle the temporary account and the accrual account.
Access: GL > Periodic > Ledger settlements
  • Search the two journals that used the temporary account. In the example 1 it was GL100322 for the AP journal and GL100323 for the GL journal.
  • Select the two transactions (button Include).
  • In the top of the form, the balance should be equal to 0
  • Accept the settlement
AccrualSchemesGL023
  • You can do the same for the accrual account
AccrualSchemesGL022

Tuesday, 24 February 2015

Allow Multiple People To Be Involved In Workflow Approval Steps


Allow Multiple People To Be Involved In Workflow Approval Steps


Not all decisions are made by just one person, there are a lot of times where you need to get multiple people involved as an internal check policy, or maybe you just love making decisions as a group and don’t want to leave anyone out. Doing this through workflow within Dynamics AX is a synch as well, because you can include as many people in a single decision process as you like and have them weigh in during the workflow execution. There are also a lot of different ways that you can allow the votes to be counted to speed up the process as well.
How To Do It…
Select the workflow step that you want to allow multiple people to approve and click on the Assignment button within the Modify Step group of the Workflow ribbon bar.
When the Assignment properties are displayed, click on the User tab and add all of the people that you want involved in the workflow step to the Selected Users side of the selection box.
Then switch to the Completion Policy tab.
If you select the Single Approver option, then as soon as one of the approvers either approves or declines this step then the task will be marked as completed.
If you select the Majority of Approvers option then you need to have a majority of the users to approve or decline the task before it will continue on. Not all users necessarily have to weigh in.
Note: make sure that you have the numbers for a majority vote so that you don’t end up with a hung jury.
If you select the Percentage of Approvers option you will be allowed to fill in a % value. This is similar to the Majority of approvers option, except you define the watermark to get the step completed.
Finally, if you select the All Approvers then all of the people that you selected in the list must approve this task before it continues on.


Once you have selected your completion policy then you can click the close button and your approval step will be updated.

General journal: manual approval

            General journal: manual approval

This article desribes how to setup and how to use a general journal with manual approval in Dynamics AX 2012.
1/ Prerequisite: Setup
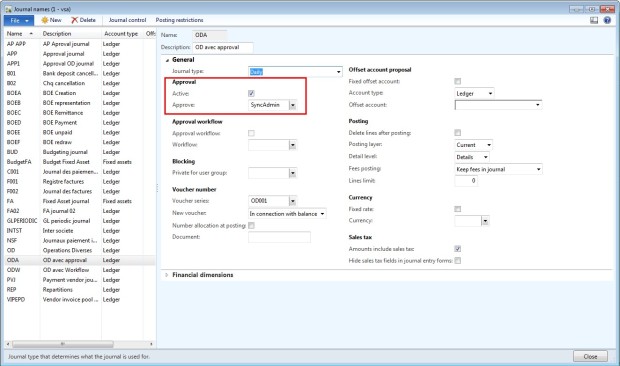
Access: General Ledger > Setup > Journals > Journal name
  • Select Approval / Active
  • In the field “Approve”, select the user group in charge of the approval.
JournalApprovalGL001
2/ User A: create a journal
Access : General Ledger > Journals > General Journal
  • Create a new journal.
  • Click on Line and update data as a regular journal.
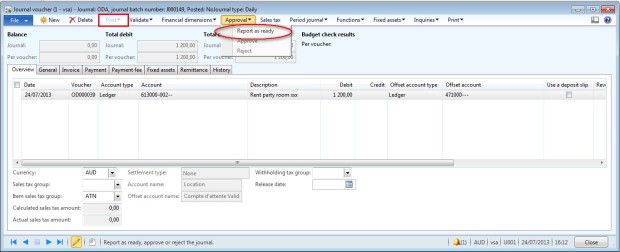
  • The button “Post” is not available.
  • Click on Approval > Report as ready.
JournalApprovalGL002
3/ User B: approve the journal
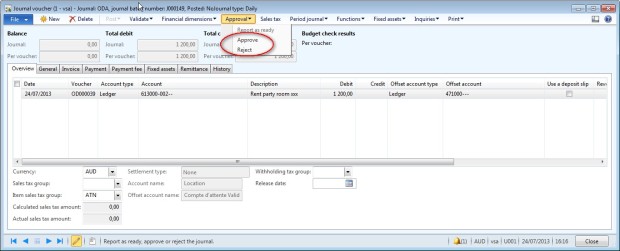
  • Open the journal.
  • Click on Approval > Approve or Reject
JournalApprovalGL003
4/ Post the journal
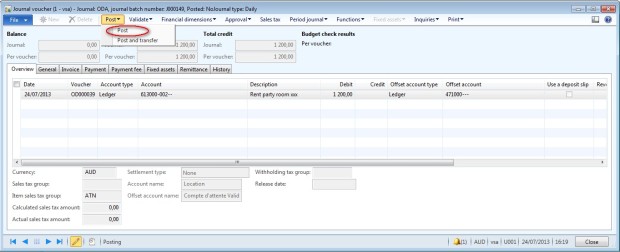
  • The journal can now be posted.
  • Click on Post > Post (from the journal voucher secreen or from the general journal screen).
JournalApprovalGL004

General journal with approval workflow


General journal with approval workflow


This article describe how to use a general ledger journal with an approval workflow in Dynamcis AX2012.
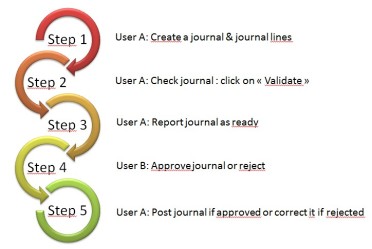
When you active an approval workflow, the process of creating and validating accounting journals have more steps:
JournalWorkflowGL001
1/ User A: Create a journal & journal lines
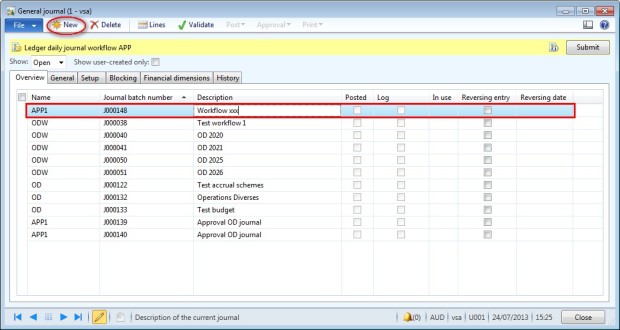
Access: General Ledger > Journals > General journal
  • Create a new journal
  • Select a journal name. If the journal is setup with a workflow, a yellow information bar must appear on the top of the screen.
  • Enter a description.
JournalWorkflowGL002
  • Click on “Lines”
  • Enter data as a regular general journal.
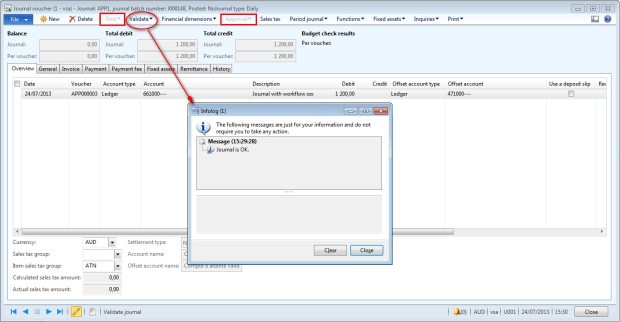
2/ User A: Check journal: click on “Validate”
  • Click on “Validate” to check if the journal is OK.
  • Button “Post” and 1pproval” are not available.
JournalWorkflowGL003
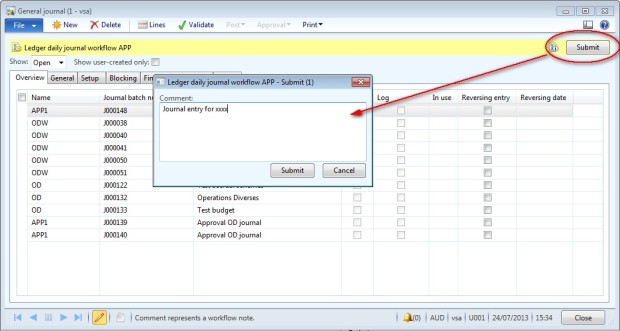
3/ User A: Report journal as ready
  • Go back to the General journal screen (header of the journal)
  • Click on “Submit”
  • Enter a comment for the user B.
JournalWorkflowGL004
4/ User B: approve or reject the journal
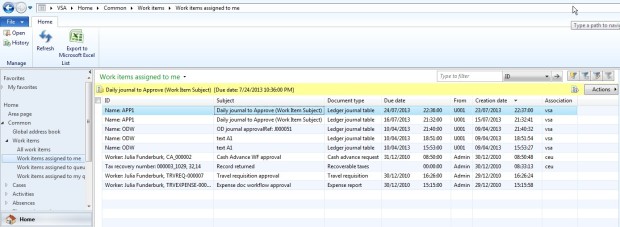
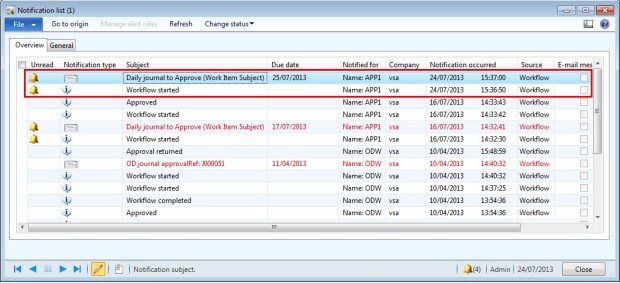
  • The user B receive a notification : go to the list of work item or just click on the “notification” button in the bottom of the screen (bell).
  • The text of the notification depends on the setting. You can add several references to help the user B to find easily the journal to be approved.
Access: Home > Common > Work items > Work items assign to me
JournalWorkflowGL005
Or notification list:
JournalWorkflowGL006
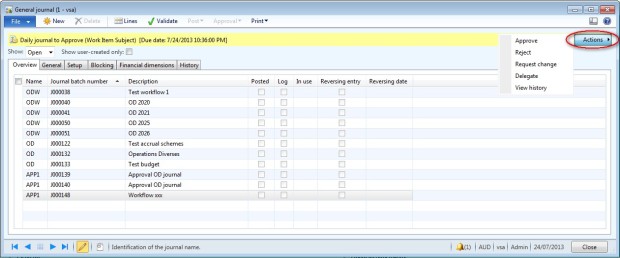
  • Click on button “Go to origin” or go to the general journal screen
  • After checking the journal, clik on “Action” and approve (or reject) the journal
JournalWorkflowGL007
5/ User A: Post journal or correct it.
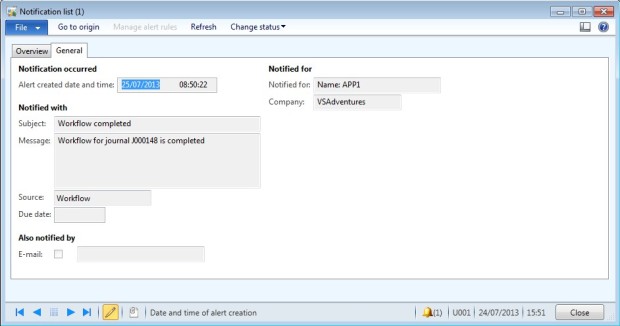
  • When the approval is completed, the user A receive a notification.
JournalWorkflowGL008
  • If the journal has been approved, the journal can be posted.
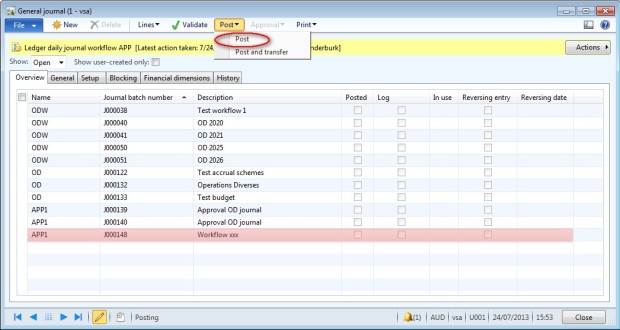
  • Click on Post > Post.
JournalWorkflowGL009
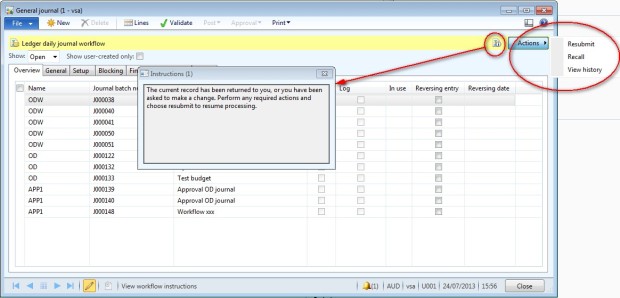
  • If the journal has been rejected, the journal can not be posted.
  • Click on “Lines” to update the journal.
  • Clicl on Action > Resubmit to send the journal to the User B.
JournalWorkflowGL010