Tuesday, 31 March 2015

Generate a check on a ledger account or a bank account [AX 2012]

You can create checks and post the amounts to the ledger accounts without posting the amount to a vendor account first. This is useful when printing checks in the following situations:
  • Cash on delivery (COD) items are delivered and there is no current invoice for the item, or the supplier has not been set up in the system as a vendor. You would create a check when the items are delivered.
  • Payments to one-time vendors.
  • Payments to vendors who do not accept credit cards.
  • Payments from one bank account to another, such as funds transfers or bank loan payments.
  1. Click Cash and bank management > Setup > Cash and bank management parameters.
  2. Select the Allow checks for bank or ledger accounts check box and then close the form.
  3. Click Accounts payable > Journals > Payments > Payment journal.
  4. Press CTRL+N and select a journal name.
  5. Click Lines and create a line.
  6. In the Account type field on the General tab, select Ledger or Bank, and then select the account in the Account field.
  7. If you selected Ledger in the Account type field, enter information in the Recipient name field on the Payment tab.
  8. When you have finished entering information for the line, click Functions > Generate payments to process the check.

Reuse check numbers

You can set up bank parameters to reuse check numbers. For example, if a check is damaged when it is being printed, you can print the same check number on a new check. The original information is voided and replaced with the reprinted check information.
  1. Click Cash and bank management > Setup > Cash and bank management parameters.
  2. Select the Allow check reuse check box to reuse the check numbers on a new check. To remove the ability to reuse check numbers, clear the Allow check reuse check box.
  3. Close the form to save your changes.

Settle open transactions

If a payment was entered and posted, but not yet settled with an invoice or other transaction, you can settle the payment and invoice by opening the Settle open transactions form from the Customers or Vendors forms.

When you click the Update button, the selected payment and invoice transactions are settled. If the payment and invoice transactions are in the same legal entity, the transactions change status according to the following rules:
If an invoice is not settled in full, it remains open.
If the amount paid is greater than the amount due, the invoice is settled and closed. The payment transaction for the customer remains open for the amount by which the payment exceeds the amount due.
If the payment amount is less than the amount due, the payment amount is subtracted from the amount due, and the invoice remains open. The payment transaction is fully settled and is closed.
If the amount paid equals the amount due, the payment and invoice transactions are closed.
NoteNote.

(FRA) Invoice holds are available to French public sector entities. If a hold is placed on an invoice, the invoice cannot be settled until either the hold is removed or the time period for the hold has passed. For more information, see (FRA) Place or release vendor invoice payment holds (Public sector).
For information about cross-company settlements, see About cross-company payment settlements.

Click Accounts receivable > Common > Customers > All customers.
–or–
Click Accounts payable > Common > Vendors > All vendors.
–or–
Click Procurement and sourcing > Common > Vendors > All vendors.

Select the customer or vendor whose open transactions you want to settle.
To settle open customer transactions, on the Action Pane, click the Collect tab, and then click Settle open transactions.
–or–
To settle open vendor transactions, on the Action Pane, click the Invoice tab, and then click Settle open transactions.

In the Settlement posting date field, select whether to post settlement transactions using the date of the most recent transaction, today's date, or a date that you specify.
Optional: To designate one of the transactions as the primary payment transaction, select the transaction and then click Mark payment.

The purpose of a primary payment is to settle all the other transactions that are selected. The transaction date of the primary payment is used in cash discount calculations and exchange rate calculations. If a primary payment is selected, the cross rate can be entered.

Select the Mark check box on the other open transactions to be settled. A red icon indicates that a transaction is already marked for settlement.

Optional: If the Mark by priority button is available, you can click this button to mark all debit transactions according to the settlement priority that is specified in the Accounts receivable parameters form. For more information about this button, see Settle open transactions - customer (form).

Optional: If the Mark invoice lines button is available when you select an invoice, you can click this button to open the Mark invoice lines form. Use this form to select individual transaction lines for settlement and modify the amounts to settle for those lines. For more information, see Key tasks: Customer payments and settlements.

You can enter the cross rate for each transaction that you selected to be settled with a primary payment transaction in step 5.

Click Update. The marked transactions are offset against each other.

General journals with template


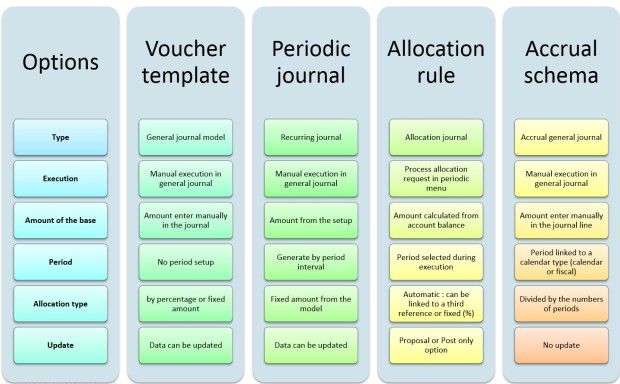
This article describes how to use general journal templates in Dynamics AX 2012. There are several options available in Dynamics AX to help you to record journal lines. You can choose the one that is the more suitable to your needs.
The options are: Voucher template, Allocation rules, Periodic journal and Accrual Schema.
JournalTemplateGL011

1/ Voucher template

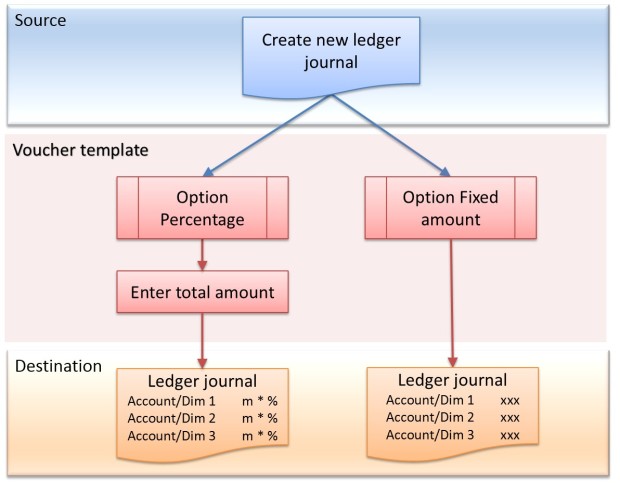
In the general journal form, you can create and use voucher template. This functionality is helpful when you have to create several time the same journal lines with no link to a period. You can also use the voucher template, to allocate an amount in severals line. The amount is entered manually when you create a new journal, and the allocation can be fixed or by percentage.
JournalTemplateGL012
Create a voucher template
Go to “Setup general ledger voucher template“

Use a voucher template
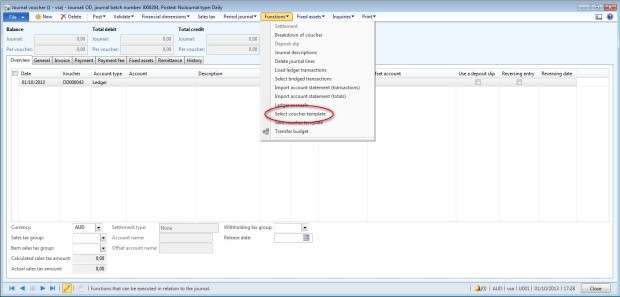
Access: GL > Journals > General journals
  • Create a new journal
  • Click on Line
  • Click on Function > Select a voucher template
JournalTemplateGL004
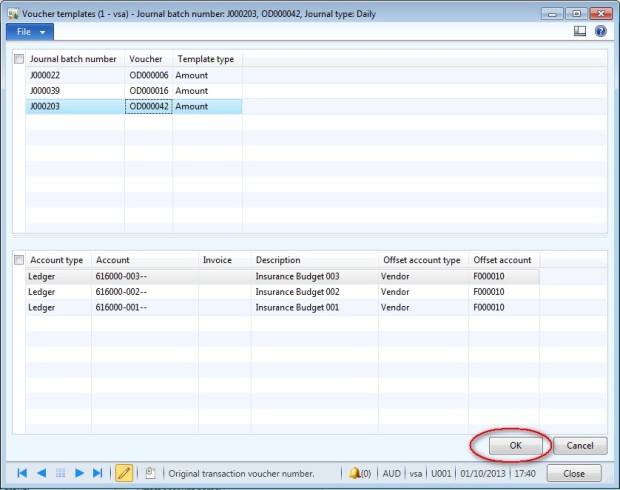
  • Option Amount : select the voucher template to use and click on OK.
JournalTemplateGL005
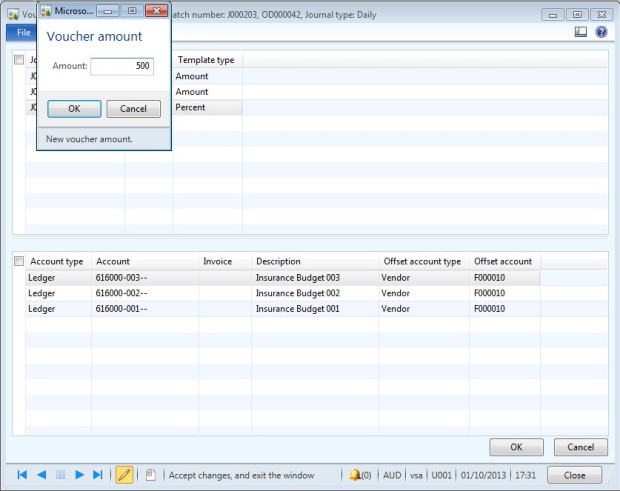
  • Option Percent: select the voucher template to use, click on OK and enter the amount of the general journal
JournalTemplateGL006
  • The general journal is created.
  • Update field if necessary and post the journal as a regular general journal.
    • Option Amount : same amount as in the model.
JournalTemplateGL008
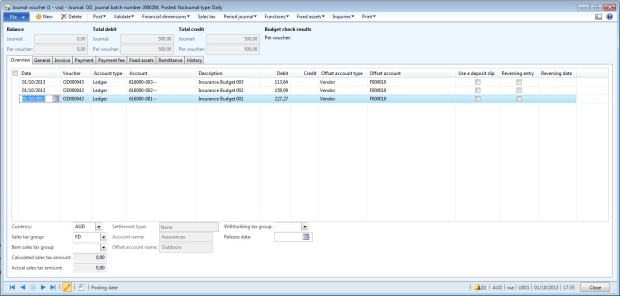
    • Option Percent : total amount 500 is distribute between the lines of the model
JournalTemplateGL007

2/ Periodic journal

Periodic journals are recurring journals because the amount, text, and other information are repeated each time that the journal is posted. This option is helpful when you have to create several time the same journal lines during a period. When you create the journal, you can specify the period interval for the recurrence, such as days or months.
JournalTemplateGL013

Create a periodic journal
Go to “Setup periodic journals”
Use periodic journal
Access: GL > Journals > General journal
  • Create a general journal
  • Go to the Lines form
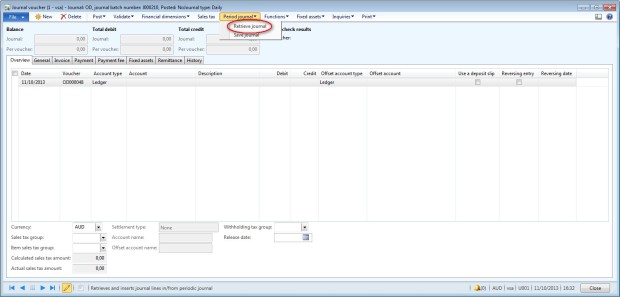
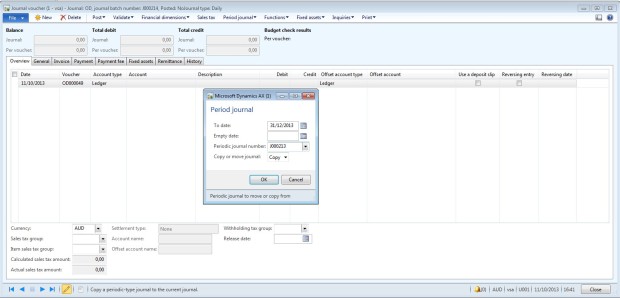
  • Click on Period journal > Retrieve journal
PeriodicJournalGL008
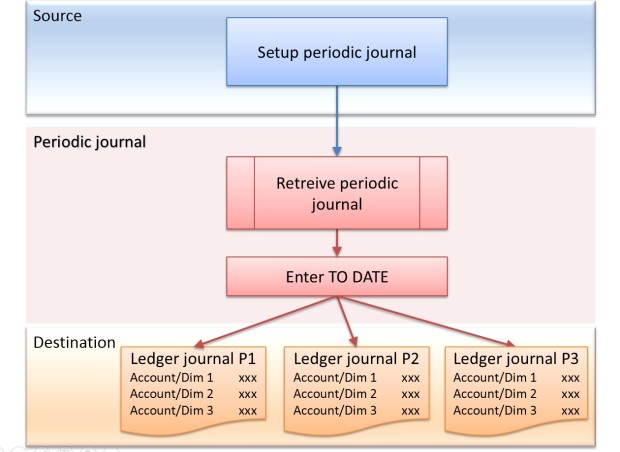
  • Enter a “To date”
  • If the line in the periodic journal does not have a transaction date, you can select one in the Empty date field. If you do not select a date in this field, the date in the To date field becomes the transaction date.
  • Select a periodic journal
  • Select an option: Copy or Move. (choose Move only if you do not need to use again the periodic journal)
PeriodicJournalGL011
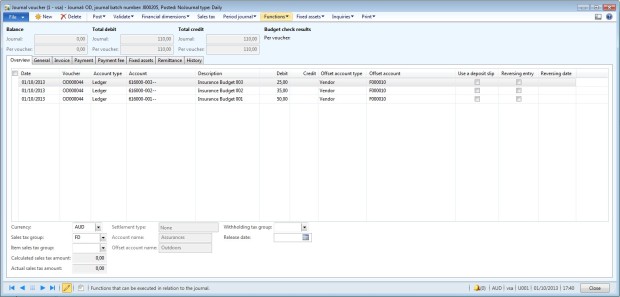
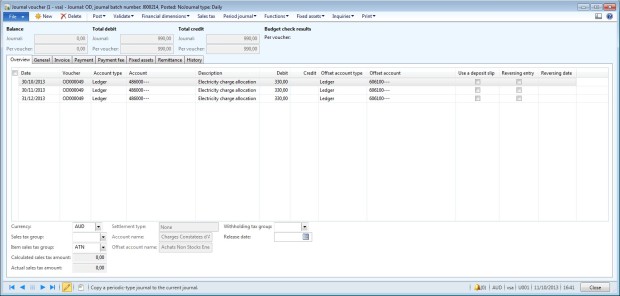
  • Journal lines are created. In this example, the to date is 3 months later than the today date, that why the system creates 3 lines, one per month.
  • Check the journal and post it.
PeriodicJournalGL012

3/ Ledger allocation rules

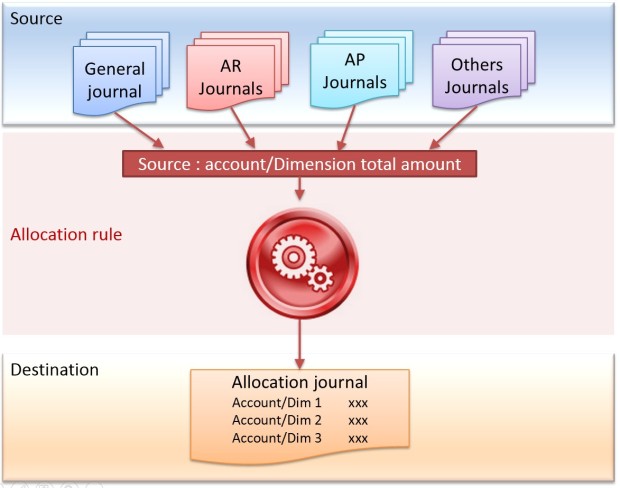
This functionality can be use to allocate a global amount in several combinations of account/financial dimension. The key of the re partition can be fixed or linked to an other account. In an allocation rule, there are several components:
  • the source: select the account/dimension you want to allocate. The total of the amount from all the journals will be the base of the allocation.
  • the destination: select all the combinations of account/dimensions that will receive an amount.
  • the rule: select the way of calculation of the allocation. It can be fixed (enter directly a pourcentage) or variable (with a linked to an other account for example).
AllocationRulesGL008
Create an allocation rule
Go to “Setup Ledger allocation rules”
Use an allocation rule
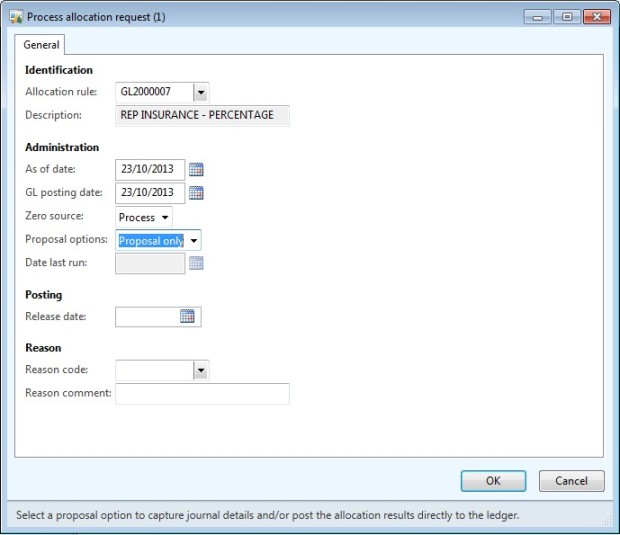
Access: GL > Periodic > Process allocation request
  • Select the allocation rule,
  • Select the start date to retrieve amount for the basis of the allocation,
  • In proposal option, select “Proposal only” to be able to check the journal or “Post anly” to directly post the journal.
AllocationRulesGL019
Access: GL > Journals > Allocation
  • Open the new allocation journal.
  • Post the journal if all is OK.
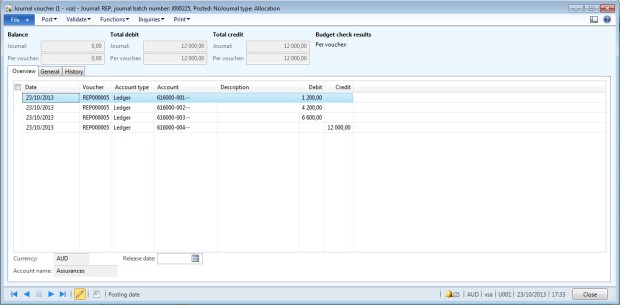
  • In the example, I have the amount of the account 616000-004 is allocate into the 3 other budgets according to the percentage of the rule.
AllocationRulesGL020

4/ Accrual schemes

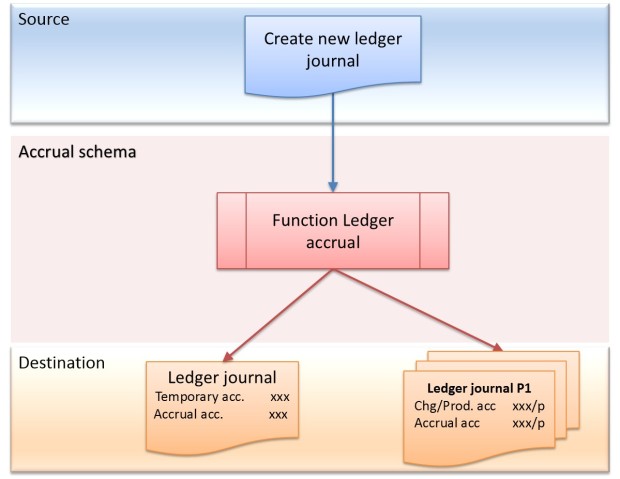
Ledger accruals redistribute the costs or revenues of a journal line so that the costs and revenues are recognized in the appropriate periods. In the first step, you enter the invoice in a temporary account. And when you use the accrual scheme functionality, the temporary account is reversed to be allocated in the charge or product account in each appropriate periods.
JournalTemplateGL014
Create accrual schemes
Go to “Setup accrual schemes“
Use an accrual schema
Access: GL > Journals > General journal
  • Create a new journal
  • Go to the line and create a new journal line.
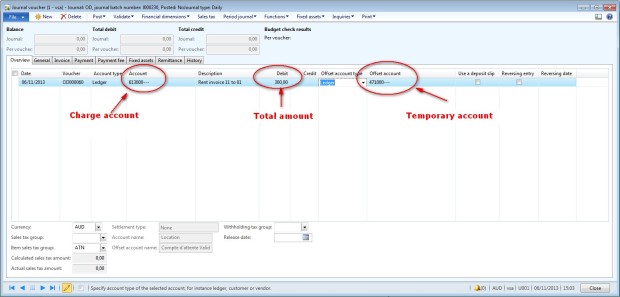
  • In the field account, select the charge account.
  • Enter the total amount of the invoice in the debit field ($300)
  • Select the temporary in the Offset account field.
AccrualSchemesGL007
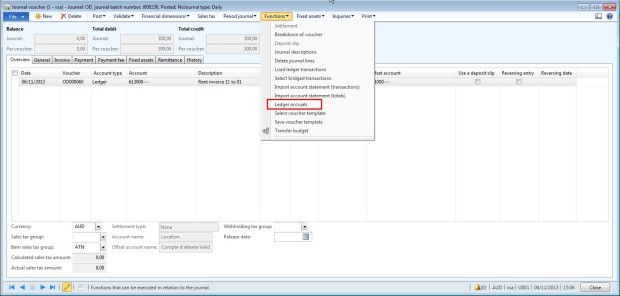
  • Go to Function > Ledger accrual
AccrualSchemesGL008
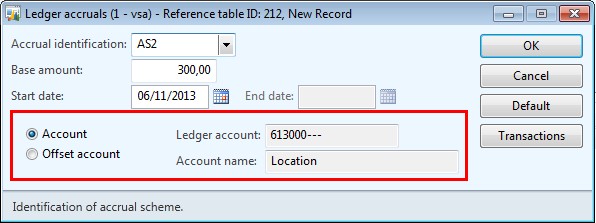
  • Select the accrual schema to use
  • Check that the charge account is selected in the field “Account/Ledger account”
AccrualSchemesGL009
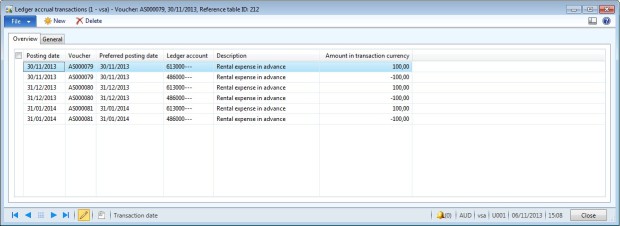
  • Click on “Transactions” to check if the accounting is correct.
AccrualSchemesGL010
  • In the example, we have 3 voucher with amount equal $100 (300/3) and each accounting date equal to the end of the three months.
  • Accounting for each voucher is: Debit = charge account and Credit = accrual account.
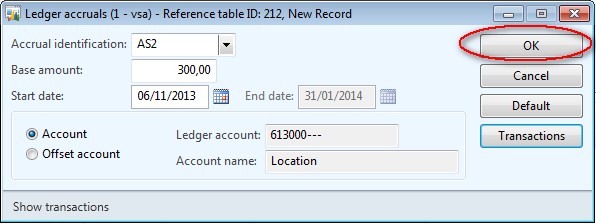
  • If the transactions are not correct, click on “Cancel”.
  • If it is correct, click on “OK”
AccrualSchemesGL011
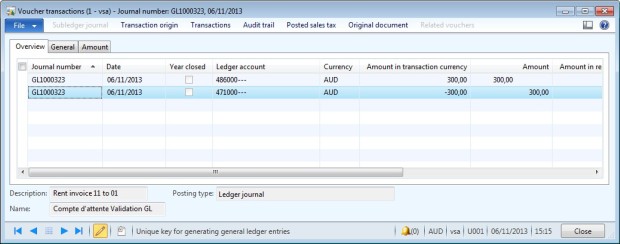
  • Post the journal.
  • Go to Inquiries > Voucher to check the accounting: Debit = Accrual account for the total amount and Credit = Temporary account.
AccrualSchemesGL012

Configuring a Basic Company in Dynamics AX


In this walkthrough we will show how you can start the process by configuring the US01 legal entity so that you can start using it. We will show how to:
  • Configure the US01 legal entity
  • Create a new business unit for the organization
  • Configure the business account structures
  • Configure the company ledger
  • Set the default accounts for the automatic transactions
  • Create a bank account for the organization

Configuring the Legal Entity

The US01 company is initially just a blank shell without a real name or purpose.
In this step we will show how to configure the US01 legal entity so that it looks a little less generic.

How to do it…

To configure the legal entity, follow these steps:
  1. From any of the existing legal entities within Dynamics AX, select the Legal entities menu item from the Organization folder of the Setup group within the General Ledger area page.
  2. Select the US01 Legal entity from the list box on the left of the form.
  3. From here you can change the NameSearch name, and also the Time zone.
  4. Expand out the Addresses group and click on the Add button to add a new address to the legal entity.
  5. When the New address form pops up, you can fill in the name of the Legal entity, and also give it an address and any contact information that you may want to relate to the organization.
  6. You may also want to expand out the Contact information group and add some other detail to the organization, just for color.
  7. When you are finished, click the Close button.

Configuring a Business Unit

To make your ledger a little cleaner, it is probably a good idea to create a new Business Unit for your new legal entity. This will allow you to separate out your organizational information, and also default in appropriate financial dimensions later on.
In this section we will show how you can create a new Business Unit for your organization.

How to do it…

To configure a business unit, follow these steps:
  1. From any of the existing legal entities within Dynamics AX, select the Business units menu item from the Organization folder of the Setup group within the General Ledger area page.
  2. When the Business Unit maintenance for is shown, click the New button in the menu bar.
  3. Enter the name of the business unit into the Name and Search name fields, and then lick theClose button.

Configuring Account Structures

Before we can define the ledger for the new organization, we need to create some new Account Structures that will be used to manage what can and cannot be posted to our company ledger from within the organization. These will be linked back to the Business unit that we just defined to ensure that it is the only area of the ledger that is updated from within the organization.
In this section we will show how to configure the Account Structures within Dynamics AX.

How to do it…

To configure the account structures, follow these steps:
  1. From any of the existing legal entities within Dynamics AX, select the Configure account structure menu item from the Chart of accounts folder of the Setup group within the General Ledger area page.
  2. Rather than create the account structures from scratch, select one of the existing B/S account structures, and from the Maintain group on the Manage ribbon bar, click on the Duplicatebutton.
  3. Give your new Balance Sheet account structure a name and description, and then click on theOK button.
  4. This will create a duplicate version of the selected account structure. To change the Business Unit that is allowed to be posted to, click on the filter icon on the right end of the Business Unitelement.
  5. Change the From and To range within the filter to the new Business unit that we created in the prior section. Now your Balance Sheet account structure should be configured.
  6. Select one of the existing P&L account structures, and from the Maintain group on the Manageribbon bar, click on the Duplicate button.
  7. Give your new Profit & Loss account structure a name and description, and then click on theOK button.
  8. Change the Business Unit that is allowed to be posted to by clicking on the filter icon on the right end of the Business Unit element and updating the from and to range of the filter.
  9. Now, select your new Balance Sheet account structure and click on the Activate button within the Maintain group of the Manage ribbon bar.
  10. Click OK on the confirmation dialog box and wait for the account structure to be activated.
  11. Repeat the same process for the Profit & Loss account, and you will be done.

Configuring Company Ledger

The next step in the configuration is to define the Company Ledger linking the account structures to the organizations chart of accounts, and also to default in some account codes.
In this section we will show how to configure the Company Ledger for the US01 organization.

How to do it…

To configure the company ledger, follow these steps:
  1. Change the Legal Entity to US01.
  2. Select the Ledger menu item from the Setup group within the General Ledger area page.
  3. When the Ledger dialog box appears, select a default Chart of accounts from the dropdown on the field.
  4. Select a default Fiscal calendar from the dropdown on the field.
  5. Also, select a default Accounting currency for the Ledger.

  6. From the Account structures group, click on the Add button in the groups menu bar, and select the Balance Sheet account structure that we just defined in the prior step.


  7. The system will tell you that this will change the account structure, and since there are no old transactions, lich Yes to proceed with the update.
  8. From the Account structures group, click on the Add button in the groups menu bar, and select the Balance Sheet account structure that we just defined in the prior step.
  9. The system will tell you that this will change the account structure, and since there are no old transactions, lich Yes to proceed with the update.
  10. Repeat the process again, except this time select the Profit & Loss account structure that we just created.
  11. For the inter-organization balancing to work, select the Business Unit from the Balancing financial dimension.
  12. And click Yes to continue with the update.
  13. Finally, fill in the default accounts for the currency revaluation, and then click Close to finish the setup.

Configuring Automatic Transaction Accounts

There are a few additional defaults that need to be configured for the organization that will make your life a little easier when the system is up and running.
In this section we will show how to configure the Automatic Transaction Accounts for the new organization.

How to do it…

To configure the automatic transaction accounts, follow these steps:
  1. Select the Accounts for automatic transactions menu item from the Postings folder of theSetup group within the General Ledger area page.
  2. When the dialog box appears, click on the Create default types button on the menu bar.
  3. This will create a number of default accounts to be populated. Associate the appropriate main accounts to them and click Close to finish the step.

Creating a Bank Account

Finally, while you are setting up the main information for the company, you might as well also create a default Bank Account. Although you will not use it right away, it will save you a step when you start configuring payment types etc. later on.
In this section we will show you how to create a new Bank Account within US01.

How to do it…

To configure a bank account, follow these steps:
  1. Select the Bank accounts menu item from the Common group within the Cash and bank management area page.
  2. When the Bank accounts form is shown, click on the Bank account button within the Newgroup on the Bank account ribbon bar.
  3. Enter the short code for the account in the Bank account field.
  4. Specify the Routing number and Bank account number.
  5. Also, specify a description of the bank account in the Name field.
  6. Finally specify the Main account for the bank, and then click the Close button.

Summary

Keep in mind, there are a lot of options and configurations that we skipped over while we were running through this process, We are just configuring the system with what we need in order to get the company up and available for us to start configuring the rest of the information.

Posting profiles

Posting profiles specify the ledger accounts that are affected when source documents are posted to the general ledger or when journal entries are journalized. You can set up default posting profiles for customers or vendors. The posting profiles for customers or vendors will be used as default entries when source documents or journal entries are created.
Each posting profile is associated with only one offset account. Posting definitions, on the other hand, can be associated with multiple offset accounts. If posting definitions are used, they replace posting profiles for the source documents and journals where they are used. For more information.
Posting accounts are specified for items in the inventory Posting form.
You can use posting profiles with all journals and source documents.

fixed assets depreciation to the current layer and to the tax layer


How to post fixed assets depreciation to the current layer and to the tax layer in Microsoft Dynamics AX

In many countries, companies have to maintain records of fixed assets acquisition and fixed assets depreciation for tax purposes. To post fixed assets depreciation to the current layer and to the tax layer in Microsoft Dynamics AX 4.0, follow these steps:
1.       Define two new value models. For example, define the TEST value model and the TEST_TAX value model.
2.       Click the Derived value models tab, and then link the TEST_TAX value model to the following transaction types:
    1. Acquisition
    2. Depreciation
    3. Disposal
  1. Create a group that is named TEST, and then link the TEST value model to the TEST group. Make sure that the TEST value model and the TEST_TAX value model are attached to the group.
  2. Create a new item, and then link the TEST value model to the TEST group. Make sure that the two value models are attached to the new item. Check whether all the relevant information is updated. Relevant information includes the service life and other details.
  3. Create an appropriate journal, as follows:


    1. If you want to run an acquisition proposal, create a Fixed Asset Acquisition journal for the acquisition. Then, a derived value model appears on the Value model tab. This acquisition proposal is accepted because the acquisition amount is the same for the current layer and for the tax layer.
    2. If you want to run the usual depreciation for the current layer, create a Fixed Asset Depreciation journal. After you do this, a TEST_TAX value model appears on the Derived value models tab. However, the layer for the Fixed Asset Depreciation journal is the current layer. The Fixed Asset Depreciation journal should use the TEST value model instead of the TEST_TAX value model. Therefore, you must remove the TEST_TAX value model from the Fixed Asset Depreciation journal.
    3. If you want to run the depreciation proposal for the tax layer by using the TEST_TAX value model, create a Fixed Asset Depreciation for Tax layer (FAD_TAX) journal. The depreciation proposal for the tax layer is acceptable because the layer for the FAD_TAX journal is the tax layer.
  1. Post the Fixed Assets transactions to the current layer and to the tax layer.

Note If you use the Fixed Asset Depreciation journal to post depreciation to the current layer, make sure that you remove the TEST_TAX value model from the Derived value models tab.
How to post fixed assets depreciation to the current layer and to the tax layer in Microsoft Dynamics AX