Monday, 21 September 2015

Add Default descriptions to General Ledger postings


A common complaint from AX2012 Users is that the description of the transaction, transferred through to the General Ledger, is often limited. This means that any nominal analysis is difficult, as you consistently need to refer back to AX to determine the original source of the transactions. For example, if I post Supplier Invoices relating to Advertising expenses and then run some General Ledger reports, the description only shows as Supplier Invoice :  


  • Ledger Transaction report:
  • Dimension Statement report:
  • Transaction description in Management Reporter:
The origin of the description can be seen on the Voucher:
The good news is that AX does have the ability to add more relevant descriptions to the accounting entries which are automatically posted to the General Ledger (such as SO/PO Receipts and Invoices).
  • Go to Organisation administration -> Setup -> Default descriptions. By default, only one entry is normally setup for Expense report transaction types:
  • Create a New record and select from the list of available transaction types. In my example, I have added Purchase Order - Invoice (Ledger and Supplier):
  • Next, in the Language field, select the language that this description will apply to. I have selected EN-GB.
     
  • Finally, in the Text field, type the description which you want to appear automatically on the transaction (this can be a mixture of free text and fixed variables). Note that the fixed variables relate to AX fields relevant to the different transaction types, for example, the variables for a Purchase Invoice would be:
    • %1: Adds the posting date
    • %2: Adds the Supplier Invoice number
    • %3: Adds the transaction Voucher number
    • %4: Adds the Purchase Order Number
    • %5: Adds the Supplier account Number
    • %6: Adds the Supplier group
  • As an example only, I have entered Sup Invoice %1 %2 %3 %4 %5 %6. However, in reality this would be overkill and it would be more realistic to just capture the PO number (%4), Supplier number (%5), and Supplier Invoice number (% 2):  
  • To test this new setup, I create a new Purchase Order for Advertising expenses:
  • I then post a Purchase Invoice against this Purchase Order: 
  • This time, when I view the description on the Invoice Voucher, it shows Sup Invoice 11-May-15 Inv12330 PIV-110000556 000638 US-110 40. 
Invoice Number = Inv12330, PO number = 000638, and Supplier Number = US-110
  • Now when I run my General Ledger reports for Advertising Expenses, this extended description is more meaningful to the User (as the PO and Supplier number is shown):
  • Management Reporter (transaction level):
(Note that Attribute Columns can also be used in MR to pull through additional information, such as Supplier and Transaction description. However, using Default Descriptions would improve the information in standard AX reports).  
There is no definitive list of recommended transaction types to create, so it would be advisable to carry out some testing in a non production AX environment. However, other logical transaction types would be: 
Customer - Invoice Ledger
Customer - Invoice Customer
Sales Order - Delivery note, Ledger
Purchase Order - Product receipt, Ledger
Stock - journal - Adjustment
Stock - Journal - Move
Stock - Journal - Counting

Thursday, 17 September 2015

Advance Bank Reconciliation in AX2012 R2

Overview  


Advanced bank reconciliation is a new feature of AX2012, available from R2 onwards.

This new feature allows for the import of bank statements that can be automatically reconciled from within AX2012. This blog shows how to perform an advanced bank reconciliation and assumes that AX has been setup correctly.

Import The Bank Statement


Once a bank account has been set up to allow bank statement imports, the “Reconcile” group becomes available in the action pane.


Click the “Bank statements” button to open the bank statements list page.

The following form will be opened, click the “Import statement” button to continue.


Select the following :
  • Bank account – Select the bank account that the statement will be imported into.
  • Statement format - Select the appropriate bank statement format.
  • File folder – Set the inbound folder where the files to be processed are held.
  • Import all files in this folder – Tick this is all files in the folder are to be imported.
  • Select file – Use this option to manually select a specific file. Reconcile after import – Select this to perform automatic reconciliation (Only if the rules have been set against the bank account).


Click Ok to continue.


When opened, the following will be displayed.

The “Net amount” and the “Total lines” fields will automatically populate when the “Validate” button has been clicked.
The bank statements must be validated before a reconciliation can be performed.

Bank Reconciliation

After an electronic bank statement has been imported and validated in the Bank statements form, the bank statement can now be reconciled using the Bank reconciliation worksheet form.

Note : The Bank reconciliation option is only available if the Advanced bank reconciliation check box is selected in the Bank accounts form on the Reconciliation FastTab. 

This can be performed in one of two ways :

Click Cash and bank management > Journals > Bank reconciliation

Or

Click Cash and bank management > Common > Bank accounts. On the Action pane, in the Reconcile group, click Bank reconciliation.

Click New to create a new bank reconciliation record

Select the appropriate bank account, this will select the bank statements that have not yet been reconciled.

Note : Any previous un-reconciled balances will be added in to this bank reconciliation journal.

Click the “Lines” button


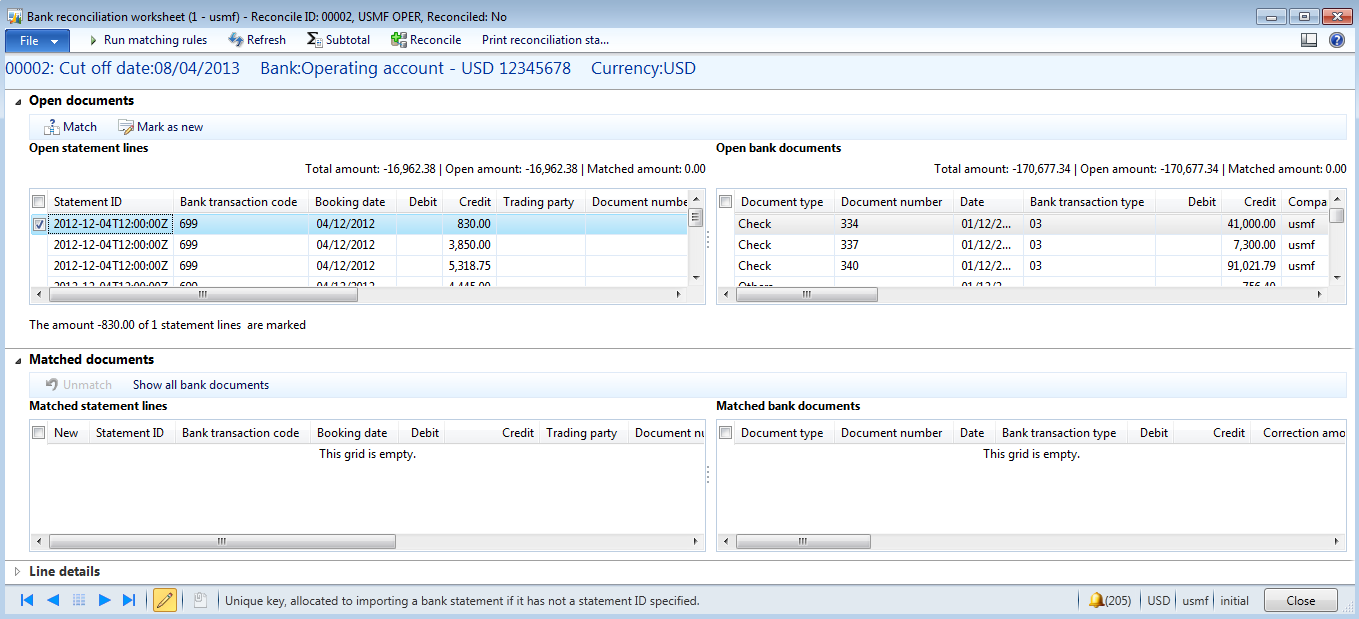
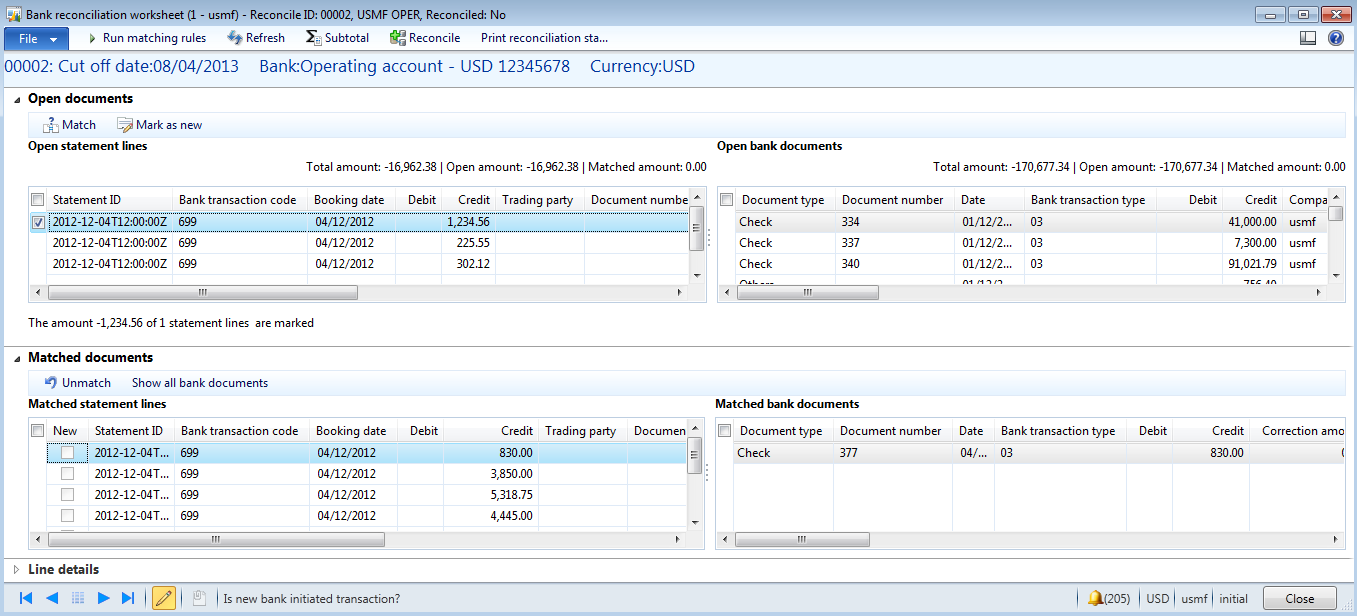
The reconciliation worksheet will be displayed, this worksheet is split into four distinct grids :
  • Top left – Open statement lines – Imported un-reconciled bank statement lines
  • Top right – Open bank documents – Un-reconciled AX bank transactions
  • Bottom left – Matched statement lines – Matched bank statement lines Bottom right Matched bank documents – Matched AX bank transactions
 

The Line details FastTab will show additional line details for the selected statement line.

To match using the matching rules that have been set up, click the “Run matching rules” button.


Select either to run individual rules, or to run a set of rules.


Once run these match all transactions that meet the criteria set on the rules.


There is a one-to-many relationship between the “Matched statement lines” and the “Matched bank documents”.
Transactions can be manually matched by selecting the appropriate line(s) in both the Open statement lines grid and the Open bank documents grid, then clicking the “Match” button.

If there is a new transaction on the bank statement that does not yet exist in AX (eg bank charges), then mark the transaction and click “Mark as new”.


Once you have completed your matching process, click “Reconcile” to perform the reconciliation process.


If there are any transactions that you have marked as new, these will need to be posted.

Browse to : Cash and bank management > Common > Bank statements, then edit the appropriate statement.

Select the line marked as “New”


On the line details FastTab, enter the appropriate financial details and financial dimension values

Then click “Post” to post the transaction.


The transaction will now have been posted and reconciled.

Cancel A Reconciled Transaction

 Individual “reconciled” bank transactions can have the reconciliation status set back to un-reconciled.
To do this browse to : Cash and bank management > Common > Bank document list 
Select the reconciled transaction, then click “Reconciliation relations”

From the Reconciliation details form, click the “Cancel reconciliation” button

Click OK to continue


The transactions will appear on the next reconciliation as un-reconciled items


The bank statement will have been fully reconciled now.

Thursday, 3 September 2015

Dynamics AX 2012 Ledger transactions/balances Import using Excel Add-in

Purpose:The purpose of this document is to illustrate how to use Microsoft Dynamics AX 2012 Excel Add-in for import of ledger transactions.
Challenge: Data model changes in Microsoft Dynamics related to high normalization and introduction of surrogate keys made some imports more complex. In fact the data model forming General Journal was not dramatically changed and import principle remains the same – populate the journal and then post the journal. However some information which is usually automatically generated in Microsoft Dynamics AX 2012 Rich Client by means of number sequences such as voucher number will have to be provided.
Solution: Microsoft Dynamics AX 2012 ships with General Journal AIF Web Service (LedgerGeneralJournalService) which can be used in integration scenarios. Also General Journal AIF Web Service can be used in Excel for import of ledger transactions. In order to import ledger transactions using Excel the mentioned AIF Web Service will be used.
Assumption: The assumption is that appropriate reference data such as main accounts, etc. was created in advance.
Data Model:
Table Name
Table Description
LedgerJournalTable
The LedgerJournalTable table contains all the defaulting and state information pertaining to a single journal. The transaction details of a journal are managed in the LedgerJournalTrans table.
LedgerJournalTrans
The LedgerJournalTrans table contains the transaction detail information that pertains to a single journal. The individual transaction lines are also referred to as voucher lines. The journal is a record in the LedgerJournalTable table.
Data Model Diagram:
image
Walkthrough:

Connection
image
Add Data
image
Field Chooser
image
Accounting structure
image
LedgerJournalTable
Field Name
Field Description
Journal batch number
Name
Description
image
LedgerJournalTrans
Field Name
Field Description
Journal batch number
Voucher
Date
Company accounts
Account type
LedgerDimension
LedgerDimension.MainAccount
LedgerDimension.Department
Description
Debit
Credit
Currency
image
Sequence:
1. Publish All
Result:
Dynamics AX – General Journal
image
Dynamics AX – General Journal lines
image
Dynamics AX - Posting
image
SQL Trace:

Summary: For the purposes of small or medium data migration (data conversion) where performance is not a concern Excel can be used for import of ledger transactions into Microsoft Dynamics AX 2012. General Journal AIF Web Service (LedgerGeneralJournalService) can be used in Excel for import of ledger transactions. Excel template can be created and used for import of ledger transactions.