This article describes how to setup a financial statement in GL module in Dynamics AX 2012.
1/ Introduction
The financial statement functionality in AX 2012, is a tool that allow to create a personalize report to analyze ledger balances. It’s possible to create all the report you need with each dimension and main account.
To create a financial statement, there are 5 steps:
(*) Mandatory
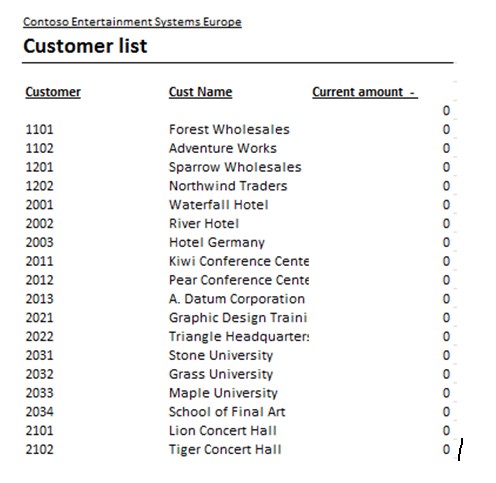
Example of a financial statement:
2/ Financial Statement : Prerequisite
Before creating your statement in AX2012: take a model or draw the statement you need.
- Determine which dimension you need (included main account)
- Determine if all the value of a dimension are used or if you need a selection.
- Identify in each rows if it contains: values, calculation or title.
- Identify in each columns which period and amount you need (D/C/both; budget/current ; calculation…)
3/ Create a financial statment
- 3.1 / Step 1 : Dimensions set
Create several dimension sets as you need and at least one per dimension. You can select main account or dimension. Exemple : Main account + Budget, Customer, Cost center + department…
Access: GL > Setup > Dimension > Dimension set
> Click on new
> Enter a code in the field “Financial Dimension set”
> Enter a description in the field “Name”
> In the tab “Financial dimensions”, select one or several dimension (included main account) and put them in the order you need to use it.
- 3.2/ Step 2: Row definition
The row definition allows to organize the row structure. It is not mandatory. If you just want a list of dimension value, you can create a financial statement without a row definition.
Example without a row definition:
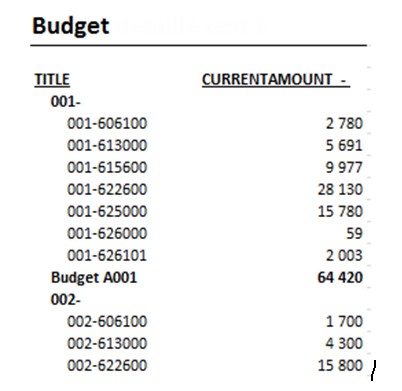
Example with a row definition:
Access: GL > Setup > Financial statement > Row Definition
> Click on new
> Enter a code in the field “Row definition”
> Enter a short description in the field “Name.
> Select a dimension set.
> The field « Depth » is automatically updated by AX.
Row definition: Structure designer
> Click on “Structure designer” to setup the row definition.
> Click on “create” to add a row.
> Select the type: “Dimension” to add dimension value, “Group” to make a group of dimension values, “Structure” to select another row definition, “Calculation” to add a calculation row (total, percent,…), “Exception” to add at the end of the report the row not used.
> Click on “Edit” to setup or update the row.

Type “Dimension”:
> If you need one dimension value: select the value
> If you need a range of value: write « VALUExx..VALUEyy»
> If you need all the dimension than begin by the same value : write VALUE*
Type “Group”:
> Create a parent
> Select “Header” if this line should be header line.
> Select “Subtotal” to some all the child of the row.
> Select other option you need.
Type “Structure”:
If several statements have the same structure, you can create a row definition for the common structure and use it in other main row definition.
Type “Calculation”:
> Select dimensions or group to sum.
> To write the calculation expression use the button « sum up »
Type “Exception”: You can add at the end of the statement a list of missing row or duplicate row.
Simulate row definition
Use button “Simulate” to check if all the values you need are in the structure.
- 3.3/ Step 3: Column definition
The column definition is in the bottom tab of the financial statement screen.
Access: GL > Setup > Financial statement > Financial statement
> Click on “New” to create a new financial statement
> Select the dimension set : if the statement is going to use a row definition, select the same dimension set.
> You can choose a secondary dimension set.
Dimension set options:
If you statement need to analyze two dimensions, you can choose to use one dimension set with two dimensions or to join two dimension sets with one dimension each.
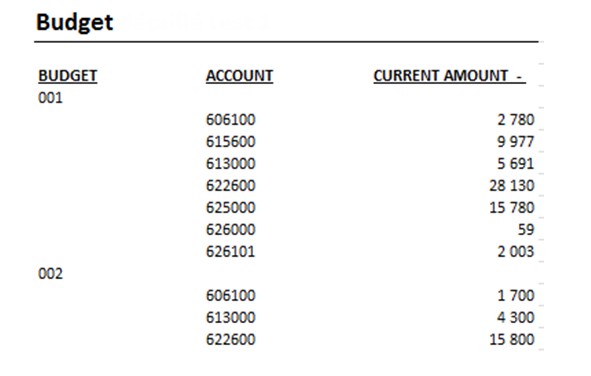
Example 1: one dimension set with two dimensions
Example 2: two dimension sets
When you create a new column, it takes the number “0” temporary, after validation, you can move the column with button « Up » and « Down ».
> Click on “Add” to create a new column.
> Enter the title of the column in the field “name”
> Select the column type:
– Primary dimension set code : to display the code of the first dimension
– Primary dimension set name : to display the description of the first dimension
– Secondary dimension set code : to display the code of the second dimension
– Secondary dimension set name : to display the description of the second dimension
– Current : to display the current balance of the main account/dimension
– …
Column with amount:
When the column contains amount (type current or budget for example):
-you can add a date interval code to specify a period (previous period, quarter, current year, last year, …)
 – you can add a selection with other criteria : click on « Select » button and add a filter. Select the field : Currency, Ledger account, amount, quantity,…
-you can choose to print only debit amount or credit amount.
Column with calculation
When the column type is « calculation »: write the expression in the tab « Calculation ».Write « # » and the number of the column and use calculation symbols (+-/*).
- 3.4/ Step 4 : link all the elements
Access: GL > Setup > Financial Statement > Financial statement
In the tab “Setup”:
- Select the primary dimension set
- Select a second dimension set if you need
- Select a row definition for the primary dimension set
- Select a row definition for the second dimension set
- Select default option for the statement: Header line, Skip zero, …
4/ Generate the statement
Access: GL > Report > Transaction > Financial Statement
- Select financial statement
- Select an output type
- Select date if you need
- Other informations are updated automatically with the default options setup in the financial statement. You can change default value.


No comments:
Post a Comment